Welcome
Welcome to my website that features what I learned in my first digital media course at the University of Missouri. The website includes digital images, audio, and video files and an explanation of how each project was completed.
Links to Banner, Baby Icon, Candle Gallery, AudioRecording, and Video Recording
This project consists of the creation of a banner that is suitable for the homepage of a website, designed for parents. The project sends a message of parenting as it includes the father with his daughter on his shoulders, and a happy baby. It consists of a tranquil landscape image of a natural green field with trees in the far distance, and blue skies in the horizon. To fulfill the requirements of this project, I downloaded a background image from the digital media resources folder and saved it in Photoshop cc, resized the image to 1000(h) x 400(w) pixels, created a new layer for the text by selecting the create new layer icon at the bottom left of the screen, and changed the font, color and size of the text by using the relevant buttons on the horizontal navigation bar on the screen. I selected the font Segoe UI Emoji, 30pt, and changed the color to a deep pink color. I selected a warp shape text design (rise) with a +60 % bend. I added two foreground images and used several tools and functions including the magnetic lasso tool, eraser tool, cropping, zooming, and mask layering to achieve the desired outcome of this project.

I used the image of the baby and resized it to the dimensions of dimensions of 100x 100. I selected image then canvas size, and changed inches to pixels from the drop-down box then resized the image to 100(w) x 100(w) pixels, ensuring that the image was centered. To achieve the required dimensions of 100x 100, I clicked on image, then image size and changed the height (in pixel) to the lowest common denominator of 100. This action did not yield a width of 100 pixels so I cropped the image to remove the additional amount. Because the image has a background and several colors, I created a new layer to be able to crop the image and remove the background. I cropped the image by (a) zooming in the image to 200% for better visibility, (c) clicking on the magnetic lasso tool, using the tool to select and closely follow the contours of baby. I used the eraser tool to remove the rough edges and create a neater finish. To eliminate the excess colors, I clicked on images, mode, then index color which asked if I want to merge layers. I selected ok. I then selected local adaptive, check-marked transparency, selected custom, and entered 4 for number of colors. From the custom option, I selected three colors.

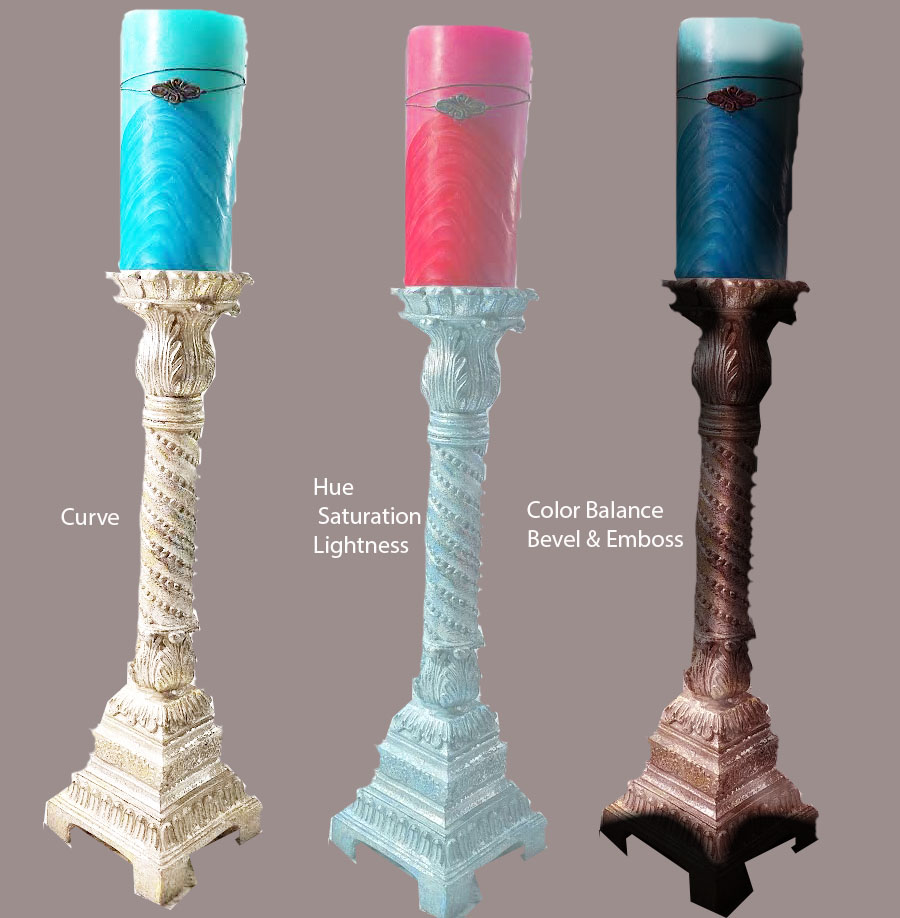
I used my Samsung Galaxy s7 edge mobile phone to capture the image of a candle on a stand, then manipulated the original image to produce three other images by applying several imaging techniques in Photoshop. These techniques included Color Balance- Bevel & Emboss (Image 1), Saturation/Hue/Lightness (Image 2), and Curves (Image 3). I used the slider tool from middle to right to achieve the new appearance of the candle and the candle stand. I labeled each image with the technique applied by using the Text tool to create the individual labels.
This project consists of a digital audio file that demonstrates my understanding of the process and procedures necessary to capture and manipulate audio information and prepare it for playback on the internet. I created a file that I plan to use as an Introduction to one of several courses that I facilitate; HM345 Event Management. I downloaded and installed Audacity 2.1.0 from: Audacity and Lame mp3 encoder, purchased Autumn Sky music track by Mark Stevens’ album entitled Portrait of Smooth Jazz from Amazon.com, then downloaded the mp3. format of the Autumn Sky music track to my PC. I familiarized myself with many of the commands, tools, functions, and visual effects. I used the Compressor effect tool to reduce the dynamic range of audio by permitting the recorded voice to be amplified further (without clipping) than would be otherwise possible. I added the background music by importing the Autumn Sky mp3 audio file, and used the Time Shift tool to move the recorded voice clip slightly to the right side which allowed me to successfully incorporate fading music volume as voice entered, at a gradual and noticeable pace. As the voice recording approached the end, I used the Envelope tool to fade the music back up, then I faded down. I saved my recording and uploaded it to Soundcloud.
Here is the link to Welcome To Event Management Audio: Soundcloud.
This project consists of a digital audio file that demonstrates my understanding of the process and procedures necessary to create a digital video file by capturing and manipulating audio and visual information and preparing it for playback on the Web. I created a horror home movie featuring my son returning home from college at the end of the semester. This new idea was my son’s! He is a Studio Art - Character Animation major who is determined to land a career with Pixar, so he thought it would be funny to create this film. I used a Samsung Galaxy 7 Edge phone to record several video clips then imported them into Windows Movie Maker. I added the title screen (I Know What You Did Last Semester), sequence one, and sequence two by switching to timeline view on the storyboard. From Move Tasks list above, from under "edit movie" list, I chose "Titles." I selected Text on clip from the wizard options and typed “I Know What You Did Last Semester” in the text box provided. I kept my font simple (Elephant size 48) and my color white. I incorporated five sequences throughout the movie, and the Dramatic Metal Scape sound file. For the title animation, I added blur to the beginning of sequence one and inserted still image inside of sequence one for 0.04 seconds, zoom in small. I utilized several other tools, features, and functions in Windows Movie Maker including cut, crossfade, and transitional smoothness. I used two still images, a glitched photograph of a woman, a black Screen, an inserted voice clip, and an Erie Wind sound effects to achieve the results of the video. I compressed and saved the project working file. To be able to share the file, I saved it as a mp4 file and published the Movie as an MP4 at a resolution below 800 x 600 to fit the 10MB maximum requirement. I uploaded the audio file to YouTube and made it accessible on the Web.
Here is the link to the video entitiled I Know What You Did Last Semester: Youtube.
Thank you for visiting my Introduction to Digital Media Website!